Monday, June 20, 2011

DIY Cotton Candy Machine

I guess this is a little off topic given the title of my blog, but I thought it was interesting enough to make a post about...

My partner has been asking me to make her a Cotton Candy Machine for ages... We finally decided to build it this-afternoon at about 4pm. Pretty late to start a project like this, but it seemed pretty easy.. didn't take too long and what we ended up with worked quite well, but It's more what I'd call a 'proof of concept' rather than a fully functional machine.

The principle of operation is that you heat the sugar to melt it and make it elastic, and the rotating bowl causes significant centripetal force on the melty sugar in an outwards direction. Ideally you want it all to escape through the fine holes in the rotating bowl, but we had lots of it exit out the top of the open bowl as you'll see in photos below.

We used a coke can, a motor, gearbox and mount from an old RC aircraft that i'd upgraded, an RC motor speed controller, an Arduino microcontroller, a 2k potentiometer (pot), and a 3 cell lithium polymer battery to power it all.

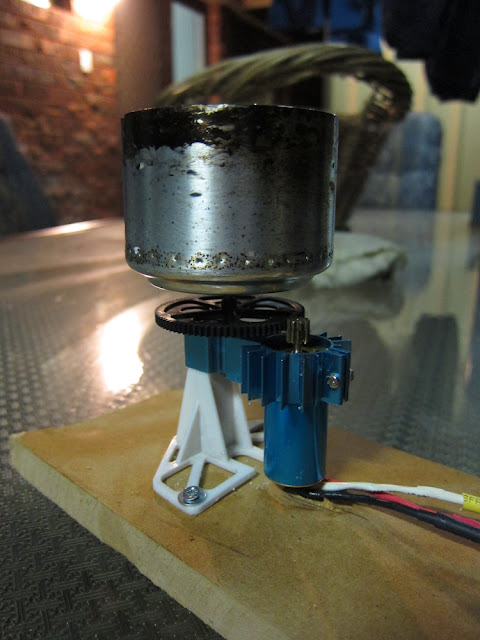
The bottom 1/3 of the coke can is used for the rotating bowl and has holes punched in it every 5 mm or so. It mounts to the gearbox output shaft with a couple of nuts and washers with a precision drilled hole in the centre. The gearbox, motor and mount made the whole thing very quick and easy to put together. The Arduino drives the motor speed controller with PWM and uses the servo library plus a very basic bit of code to read the pot value to do so. I also added some serial debugging so I could log what was actually happening. The motor speed controller has a 5v regulated output normally used in RC applications to drive the RF receiver and other servos, but in this case, it powers the micro via the 'Vin' pin.

The reason for the complexity in the motor speed control is due to the fact that the motor is a 3 phase motor, extremely common in medium to high power modern electric RC planes, cars and boats.

Figure 1: Top down view

As you can see from the pictures above, its pretty 'rustic' in its current form. The microcontroller and battery floats around loose, the potentiometer (the 'volume' knob, or pot) is double side taped to the bit of wood, and the motor mount, gearbox and rotating bowl is mounted on the other end. The main reason I doubled side taped the pot down was so i could rest my right hand on the board to stabilise it and adjust the pot one handed, whilst operating the blow torch in my left hand to heat the rotating bowl.


Figure 2: Another shot down the length


Figure 3: Motor, gearbox, stand, and rotating bowl

The rotating bowl was made from the bottom 1/3 of a coke can. I sanded the bottom of an empty can first, washed off the resulting muck, cut it to size with a hobby knife blade spaced off the bench with a thick book, and then punched holes in the bottom every 5-7 mm.

Figure 4: Plus paper shield

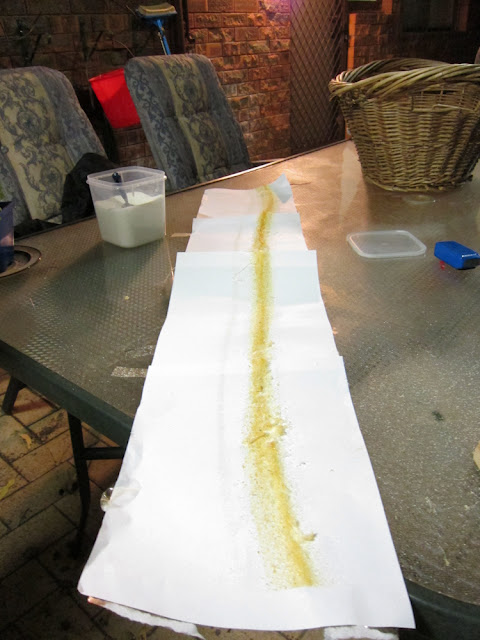
As this is a proof-of-concept, we took 4 sheets of a4 paper, and stuck them together in a ring to put around the whole thing to catch everything coming out. The yellow looking line is from the burn sugar that flew out the top of the can. This problem will be resolved in the next revision of the machine.

It hangs off the edge of the table so I can get the blowtorch neck up inside to heat the can up.

Figure 5: Inside the shield

Figure 6: cobwebs? No, thats the cotton candy forming!

It works!!
Note: you can see 2 blue spots in the can.. thats the flame from the blowtorch.


Figure 7: The whole contraption, including the blowtorch


Figure 8: My partner, Meh, holding onto her prized cotton candy!


Figure 9: The inside of the paper shield after use


Figure 10: A chunk of the yellow sugar off the paper shield.


Figure 11: The madman with the blowtorch!

 Yes, I really and crazy enough to use a blowtorch to make cotton candy :D

Needless to say, if you try this at home and burn your house down... HAHAHAHAHAHAHAHA.. I mean, don't try this at home :)

Sunday, April 10, 2011

Upgrades: ECU

I've upgraded my ECU with a Nistune board. http://www.nistune.com

Nistune is an upgrade that replaces the EPROM with a socketed board that uses nvram and a microcontroller to emulate the EEPROM. It extends the Nissan Consult protocol to allow realtime ECU tuning with a windows application.

You can also data log with the Nistune software on your laptop, including taking inputs from external sensors such as a wideband oxygen sensor, or the multi-channel USB DLP-IO-8G.

Nistune is probably the best value for money tuning solution for a GTR Skyline, or any other compatible Nissan vehicle.

Installation is easy. You pull your ECU out, post it to Matt Brown, the Nistune author/developer, and a week later, you get it back with the board installed as you can see in the photos below.


You can take it to a tuning shop at this point and pay them anywhere from $400-$2000 for a tune. Yes, I had an 'estimate' of $2000 from some joker workshop who are only interested in PFC and other ECUs they sell.

I don't trust anyone to work on my car except for myself and two other people - my Dad, and Steve from Steves Shed. Up until this point, I've done everything myself. I thought tuning it myself would be a bit risky and beyond my abilities, but I did alot of reading, and I think I can manage, however I'll be being ultra cautious and using every advantage I can get to make sure I don't blow things up.

In line with this, I've bought an Individual software licence so I can tune things myself.

There are a few more things left to do before I can start tuning. Stay... tuned?

Monday, January 24, 2011

Apple TV 2 (ATV2), jailbroken with XBMC is awesome

Over the weekend, I bought a new AppleTV.

In Australia, the cost of one of these is $128. Pretty fair price considering what it *can* do after you hack it.

It comes with a Power cord and a remote control only. No cables, so I had to also buy a cheap HDMI cable to plug it in.


Front view


Rear View


The MicroUSB connector is used for connecting to iTunes to restore the factory firmware. Its also used to flash your hacked firmware and to perform a tethered boot.


Out of the box, functionality is fairly limited, and pretty much useless to me, so within about 10 minutes of powering it up, i was already trying to jail break it.

Being a mac user (not a fanboy mind you), I was able to use Seas0nPass to do the JB and the tethered boot.

The insstructions for Seas0nPass didn't work for me for putting it in DFU mode and flashing. After some help from my good friends on IRC, I was given this link. This method seemed to work, although the process listed isn't perfect. I found the following worked for me:
  • connect usb (wait 10 secs or so) and then the power
  • press menu+play/pause for 6 secs ( until you get the faster flashing)
  • remove the power <-- this is the key <---- Seriously, this is really important.
  • put the ATV into DFU mode by menu+play/pause for 7 secs or so ( until faster flashing)
  • plug in power
  • Press the "Create IPSW" button in Seas0nPass. Say yes to scripting if it asks. It builds and uploads to ATV2, taking control of itunes in the process - dont press any buttons, leave the computer alone
  • iTunes says 'success' - no error messages
  • disconnect usb and plug in HDMI and then network cable


After the flash succeeded, for Tethered boot to work, I had to:
  • Plug in USB - wait about 10 seconds
  • Plug in Power
  • Press menu+play/pause buttons for 7 seconds to put it in DFU mode
  • Seas0nPass does some magic and eventually says success
  • Once it says success, pull out the USB cable and plug in HDMI cable before light stops flashing
  • Watch ATV2 boot, and you're done.

Next, I ssh'd in and followed instructions as per here for XBMC.


Win!

As a media centre, XBMC is as good as I remember it to be on my old original Xbox, except with the AppleTV2, it will render up to 1080P content. Unfortunately it only outputs 720P, but its hard to tell the difference, even on big 52" TV.


The interface is slightly laggy, but I'm sure thats something they'll fix in future revisions of XBMC. Given how good the development was back when i used it on my old Xbox, I'd say it wont be long before that problem is fixed.


So far its played pretty much everything I've thrown at it with the exception of ISOs of DVDs sitting on my file server. There was also one 720P AVI that was playing, but was a bit jerky. 720P and 1080P MKVs with subtitles are no problem, neither are your average standard def .avi TV episode.


I highly recommend this as a cheap media centre solution for anyone with a HDMI capable TV/Stereo.