Monday, June 20, 2011

DIY Cotton Candy Machine

I guess this is a little off topic given the title of my blog, but I thought it was interesting enough to make a post about...

My partner has been asking me to make her a Cotton Candy Machine for ages... We finally decided to build it this-afternoon at about 4pm. Pretty late to start a project like this, but it seemed pretty easy.. didn't take too long and what we ended up with worked quite well, but It's more what I'd call a 'proof of concept' rather than a fully functional machine.

The principle of operation is that you heat the sugar to melt it and make it elastic, and the rotating bowl causes significant centripetal force on the melty sugar in an outwards direction. Ideally you want it all to escape through the fine holes in the rotating bowl, but we had lots of it exit out the top of the open bowl as you'll see in photos below.

We used a coke can, a motor, gearbox and mount from an old RC aircraft that i'd upgraded, an RC motor speed controller, an Arduino microcontroller, a 2k potentiometer (pot), and a 3 cell lithium polymer battery to power it all.

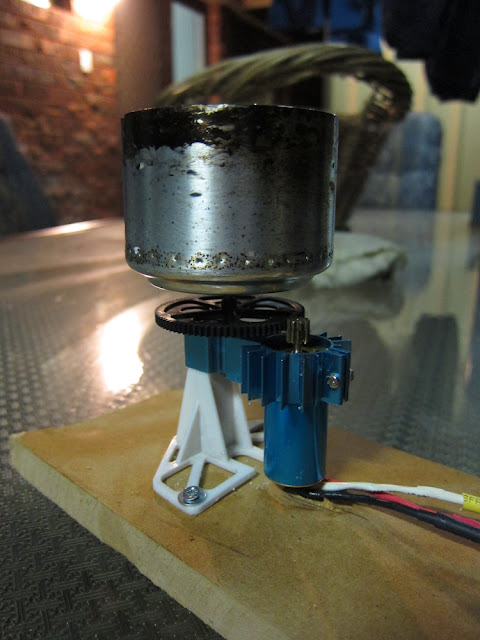
The bottom 1/3 of the coke can is used for the rotating bowl and has holes punched in it every 5 mm or so. It mounts to the gearbox output shaft with a couple of nuts and washers with a precision drilled hole in the centre. The gearbox, motor and mount made the whole thing very quick and easy to put together. The Arduino drives the motor speed controller with PWM and uses the servo library plus a very basic bit of code to read the pot value to do so. I also added some serial debugging so I could log what was actually happening. The motor speed controller has a 5v regulated output normally used in RC applications to drive the RF receiver and other servos, but in this case, it powers the micro via the 'Vin' pin.

The reason for the complexity in the motor speed control is due to the fact that the motor is a 3 phase motor, extremely common in medium to high power modern electric RC planes, cars and boats.

Figure 1: Top down view

As you can see from the pictures above, its pretty 'rustic' in its current form. The microcontroller and battery floats around loose, the potentiometer (the 'volume' knob, or pot) is double side taped to the bit of wood, and the motor mount, gearbox and rotating bowl is mounted on the other end. The main reason I doubled side taped the pot down was so i could rest my right hand on the board to stabilise it and adjust the pot one handed, whilst operating the blow torch in my left hand to heat the rotating bowl.


Figure 2: Another shot down the length


Figure 3: Motor, gearbox, stand, and rotating bowl

The rotating bowl was made from the bottom 1/3 of a coke can. I sanded the bottom of an empty can first, washed off the resulting muck, cut it to size with a hobby knife blade spaced off the bench with a thick book, and then punched holes in the bottom every 5-7 mm.

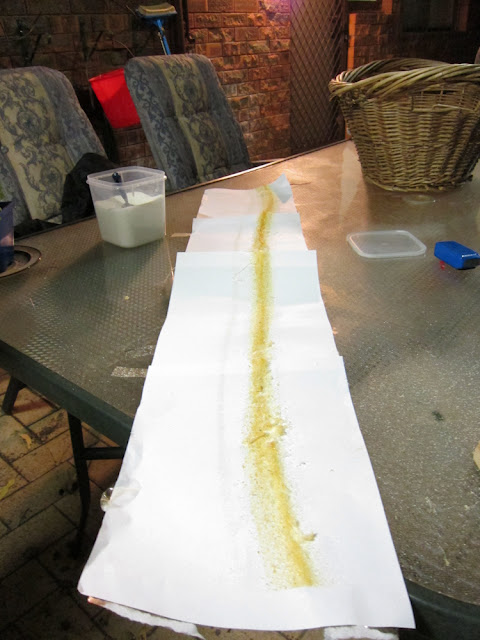
Figure 4: Plus paper shield

As this is a proof-of-concept, we took 4 sheets of a4 paper, and stuck them together in a ring to put around the whole thing to catch everything coming out. The yellow looking line is from the burn sugar that flew out the top of the can. This problem will be resolved in the next revision of the machine.

It hangs off the edge of the table so I can get the blowtorch neck up inside to heat the can up.

Figure 5: Inside the shield

Figure 6: cobwebs? No, thats the cotton candy forming!

It works!!
Note: you can see 2 blue spots in the can.. thats the flame from the blowtorch.


Figure 7: The whole contraption, including the blowtorch


Figure 8: My partner, Meh, holding onto her prized cotton candy!


Figure 9: The inside of the paper shield after use


Figure 10: A chunk of the yellow sugar off the paper shield.


Figure 11: The madman with the blowtorch!

 Yes, I really and crazy enough to use a blowtorch to make cotton candy :D

Needless to say, if you try this at home and burn your house down... HAHAHAHAHAHAHAHA.. I mean, don't try this at home :)

Sunday, April 10, 2011

Upgrades: ECU

I've upgraded my ECU with a Nistune board. http://www.nistune.com

Nistune is an upgrade that replaces the EPROM with a socketed board that uses nvram and a microcontroller to emulate the EEPROM. It extends the Nissan Consult protocol to allow realtime ECU tuning with a windows application.

You can also data log with the Nistune software on your laptop, including taking inputs from external sensors such as a wideband oxygen sensor, or the multi-channel USB DLP-IO-8G.

Nistune is probably the best value for money tuning solution for a GTR Skyline, or any other compatible Nissan vehicle.

Installation is easy. You pull your ECU out, post it to Matt Brown, the Nistune author/developer, and a week later, you get it back with the board installed as you can see in the photos below.


You can take it to a tuning shop at this point and pay them anywhere from $400-$2000 for a tune. Yes, I had an 'estimate' of $2000 from some joker workshop who are only interested in PFC and other ECUs they sell.

I don't trust anyone to work on my car except for myself and two other people - my Dad, and Steve from Steves Shed. Up until this point, I've done everything myself. I thought tuning it myself would be a bit risky and beyond my abilities, but I did alot of reading, and I think I can manage, however I'll be being ultra cautious and using every advantage I can get to make sure I don't blow things up.

In line with this, I've bought an Individual software licence so I can tune things myself.

There are a few more things left to do before I can start tuning. Stay... tuned?

Monday, January 24, 2011

Apple TV 2 (ATV2), jailbroken with XBMC is awesome

Over the weekend, I bought a new AppleTV.

In Australia, the cost of one of these is $128. Pretty fair price considering what it *can* do after you hack it.

It comes with a Power cord and a remote control only. No cables, so I had to also buy a cheap HDMI cable to plug it in.


Front view


Rear View


The MicroUSB connector is used for connecting to iTunes to restore the factory firmware. Its also used to flash your hacked firmware and to perform a tethered boot.


Out of the box, functionality is fairly limited, and pretty much useless to me, so within about 10 minutes of powering it up, i was already trying to jail break it.

Being a mac user (not a fanboy mind you), I was able to use Seas0nPass to do the JB and the tethered boot.

The insstructions for Seas0nPass didn't work for me for putting it in DFU mode and flashing. After some help from my good friends on IRC, I was given this link. This method seemed to work, although the process listed isn't perfect. I found the following worked for me:
  • connect usb (wait 10 secs or so) and then the power
  • press menu+play/pause for 6 secs ( until you get the faster flashing)
  • remove the power <-- this is the key <---- Seriously, this is really important.
  • put the ATV into DFU mode by menu+play/pause for 7 secs or so ( until faster flashing)
  • plug in power
  • Press the "Create IPSW" button in Seas0nPass. Say yes to scripting if it asks. It builds and uploads to ATV2, taking control of itunes in the process - dont press any buttons, leave the computer alone
  • iTunes says 'success' - no error messages
  • disconnect usb and plug in HDMI and then network cable


After the flash succeeded, for Tethered boot to work, I had to:
  • Plug in USB - wait about 10 seconds
  • Plug in Power
  • Press menu+play/pause buttons for 7 seconds to put it in DFU mode
  • Seas0nPass does some magic and eventually says success
  • Once it says success, pull out the USB cable and plug in HDMI cable before light stops flashing
  • Watch ATV2 boot, and you're done.

Next, I ssh'd in and followed instructions as per here for XBMC.


Win!

As a media centre, XBMC is as good as I remember it to be on my old original Xbox, except with the AppleTV2, it will render up to 1080P content. Unfortunately it only outputs 720P, but its hard to tell the difference, even on big 52" TV.


The interface is slightly laggy, but I'm sure thats something they'll fix in future revisions of XBMC. Given how good the development was back when i used it on my old Xbox, I'd say it wont be long before that problem is fixed.


So far its played pretty much everything I've thrown at it with the exception of ISOs of DVDs sitting on my file server. There was also one 720P AVI that was playing, but was a bit jerky. 720P and 1080P MKVs with subtitles are no problem, neither are your average standard def .avi TV episode.


I highly recommend this as a cheap media centre solution for anyone with a HDMI capable TV/Stereo.

Tuesday, February 9, 2010

Scissor lift finally installed and working

Its been a long process, but we're finally there.

The scissor lift is now working.

I'll update this entry soon with more information on the lift, but for now, the URL for the youtube video is: http://www.youtube.com/watch?v=eEuunCbx8U8


Manufacturer link: http://www.nhtequipment.com/English/cpinfo.asp?id=148

Manufacturer Specs:
Lifting capacity: 3000Kg
Max lift hight: 1850mm
Lifting Time: 40s
Lowering Time: 30s
Net Weight: 710Kg
Gross Weight: 800Kg
Motor power: 2.2Kg 220/380V, 50/60Hz
Noise: 70dB
Minimum height: 115mm
Overall Length: 1435mm-2000mm
Overall Width: 2000mm
Power Supply: 220/380V, 50/60Hz
Platform Length: 1400¡«1900mm
Platform Height: 110mm
Single Platform Width: 600mm
Space between Platforms : 800mm
Motor Power: 2.2Kw 220V/380V, 50Hz/60Hz

Wednesday, October 7, 2009

Extended and baffled sump

In my first post I mentioned an extended sump. The reason behind this upgrade is the standard sump on the RB26 is fine for a street-only vehicle, but if you take it to the track and push it hard enough you'll run into oil starvation problems. Oil starvation is obviously a bad thing. A spun bearing is usually the end result, requiring a rebuild - this is where things get expensive.

In a nut shell, high G forces from cornering, accelerating and braking will cause the oil to flow away from the pickup and climb the walls of the inside of the block.

The Garage101 extension and gated baffle setup looks to be a very well thought out solution to the problem especially when combined with other fixes to resolve the other oiling issues the RB26 suffers from. In addition to the sump and gated baffles, I've also got a Garage101 Head drain to fit at the same time. There is a lengthy discussion on the Skylines Australia forums in the Forced Induction Performance section about the why the "head drain" works. Looks to be not just a drain, but a pressure sump to head pressure equalisation solution to allow the factory oil return galleries to work better. Worth a read: http://www.skylinesaustralia.com/forums/Oil-Control-Rb-s-Circui-t110680.html

At present my sump/diff is off having the diff put back together with all new bearings and seals by a differential specialist. The GTR's front diff is integrated into the sump as you'll see in the photos below.

Sump dummy fitted to a spare motor up-side-down on an engine stand:


Gated and winged baffles that need fitting inside sump:
(Note: the wings stick into the left and right sides, facing forwards)


Winged, gated baffles with top cover plate sitting on top, extended pickup sitting in the centre:


Photo of head drain block.

A summary of past events

The '89 R32 GTR Skyline is one of the most technologically advanced cars for its day. More boxes of electronics scattered around the vehicle than you could conceive of. For a car released 20 years ago it was well and truly ahead of its time.

Luckily for me I work in a highly technical field. I'm a Systems and Network Engineer dealing with ISPs and hosting company network and server infrastructures. I'm used to highly technical.

I originally bought this car way back in August 2005. It was completely misrepresented from the get go. Was listed as 'good mechanical condition' It was far from it (for example, compression was down on two cylinders, top end rattles became apparent not long after I got it, a bearing on the input shaft in the gear box was as noisy as hell, 4WD system wasn't working front wheel bearings were shagged etc etc). There was also significant rust in the body that needed fixing prior to road registration.

After months of persistent negotiation, I got a pittance of a sum from the seller to go towards the rust work, and he also paid for a really very good half cut to replace the rooted engine, gearbox and rear diff.

Getting someone to do the work proved to be a challenge. At first I took the car to a known good panel workshop. It sat there for 6 months until they went out of business. I was lucky to get the car back. An employee who was also a GTR enthusiast took my car back to his rented house. I bumped into him by chance when I went to the then out-of-business workshop and caught him as he was leaving. I suspect he was attempting to thieve my car.

Quite a few months later I found another automotive workshop to do the work on my vehicle: Steve's Shed, located in Malaga. 

Steve eventually was able to start after he moved to a new workshop in Wangara. The GTR Spent approximately 18 months in the workshop until it was ready for me to bring home and finish off prior to road registration. Work included quite alot of rust repairs - re-engineering the strength into the doorsills and floorpan area as well as fixing all the mechanical issues by transplanting all the good bits from the half-cut into the now rust free and painted body. Both myself and my Dad, Terry, spent a considerable amount of time at Steve's workshop helping to do the work. We got our hands dirty throughout the job doing welding, structural stuff, panel work, a bit of painting, and the mechanical works. I personally gained alot of knowledge and experience and now know the car back to front and inside out, barring the insides of the engine or gearbox.

The car was finally road registered in December 2008.

Since then, I've done a few mods, electronic boost controller was the first, a high-flow cat to compliment the 3" straight-through high flowing exhaust system, and the latest was a set of Tomei Poncam B's with adjustable cam gears that are still yet to be dialed in. The Poncams are designed to be a 'drop-in' replacement for the factory items and to a very large degree they are.

I've just had a Import101/Garage101 sump extension welded onto a spare sump. This is now off having the diff rebuilt with all new bearings, seals etc and I should have it back next weekend ready to fit.

Tuesday, October 6, 2009

Cheap DIY Network enabled video surveilance

After discovering some relatively inexpensive IP enabled Pan and Tilt cameras on Deal Extreme (http://www.dealextreme.com/details.dx/sku.14272) I thought I'd see if I could get them working with ZoneMinder (http://www.zoneminder.com/) - a free Linux based video surveillance recording package.

They were relatively simple to setup and get working. ZM works great with these cameras with the motion jpeg stream, and only requires a little bit of modification to make the Pan/Tilt functions work. ZM's motion detection works great and its sensitivity is very configurable but can be fairly complex.

One big caveat is the amount of CPU required to do all of this. Two cameras doing monitor only (no motion detection) used 60% cpu continually on an old Athlon 1400 test server. Motion detection on even one camera shoots cpu to 100% and things really suffer. It seemed to be able to achieve about 20 FPS, but this may be a limitation of the MJPEG server. I tested dropping the frame rate in ZM, but that didn't help CPU usage at all. I suspect a lot of the CPU time is spent receiving the video stream from the camera and whatever processing happens here. I figure for the purposes of this project I can live without full motion video - 5FPS should be plenty, so I figure I may be able to use the single jpeg frame grab functionality so the ZM capture process has a bit less work to do.